Wednesday, February 24, 2010

Dressing up some shirts


I made this one for B and it looks so cute on her!

I found different tutorials on different blogs a few months ago on making fabric flowers and ruffles to put on shirts. Here are some that I did and I must say they were for the most part pretty easy. Time consuming because it was my first time, but doable. I just took a plain t-shirt, then took fabric (I used knit for the flowers so they wouldn't fray) cut out flower shapes (2 layers for the roses and about 4 for the other flowers) then pinched them together, stitched them to keep in place then sewed on where I wanted them. For the ruffle I took the material, cut a long strip (at least twice what you need) fold in half, sew closed, turn inside out, sew zigzag stitch over knitting thread down the middle then pulled out to ruffle (I don't sew and don't know how to explain this at all). Then pinned on shirt and sewed it on. I will try and find the blogs that had them because they had step by step instructions, plus they deserve the credit.

Mini Kisses


I found this on a blog somewhere and thought it was such a cute idea. You wrap chocolate chips in foil with a little strip of white tissue paper sticking out. So easy and ours turned out great. We made these little bags for teachers at church for Valentine's day. -Hopefully you can see the kisses in the bags, it's the only pic I took of them.

Friday, February 12, 2010

Stain-glass Hearts

Boston and I made these stain-glass hearts the other day. Actually, I don't really know what to call them so I made that whole stain-glass thing up. :) They are super easy! Here's what you need:


Contact Paper
Tissue Paper - precut into little pieces
String - to hang it up

Lay out a piece of contact paper sticky side up. Have the kids stick the tissue paper onto the contact paper. *important info - make sure that it's only one layer of tissue paper. I usually shake it off and pull off the extra paper on the chunky spots* Then place another piece of contact paper on top, sticky side down. Cut out your heart, punch a hole, and hang it near a window so you can see how pretty it is when the sun shines through! :)

Thursday, February 11, 2010

Heart Crayons


The kids and I made these heart crayons out of some broken crayons we had. They were really easy to make and they turned out cute! Give them a try! Here
is where you can find these.

Choo-choose cupcake

For Malia's Joyschool Valentine Party I made these cupcakes. Or at least I tried :) I got the idea here.

Friday, February 5, 2010

Furniture Uplift

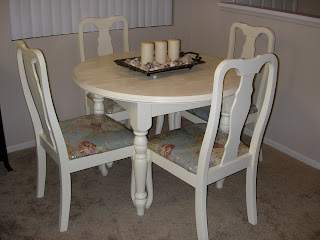
We have been working hard on re-doing our table and chairs. My friend Carley gave me these chairs right after I got divorced (wasn't that sooo nice?!). The table is that round one that Jaime had, then she gave it to Kacie who then finally gave it to me. ;) We decided that they needed an uplift. After a lot of blood, sweat, and tears - well more like a lot of striping, sanding, and painting - we can finally enjoy our beautiful dining table and chairs! Here are some pictures to document the process:

The chairs looked like this:

Then we sanded them and they looked like this - actually, this one isn't sanded! I guess we didn't document too well. This one just has the seat removed :)

Then we painted them and re-covered the seats with some fabric I had:

Then we painted the table... ta-da! (we also covered the seats with some plastic - I don't know how long it's going to last, but at least it will protect them right now)

Here is our centerpiece I put together tonight - a tray that I had, plus some candles and shells!
*Disclaimer: I put that little wandering shell back into the tray... I didn't notice it was there when I took the pictures. :)

Monday, February 1, 2010

Valentine Window Art

This is a quick, easy, and fun art project. All you need is 3D craft paint, Parchment paper (you could also use wax paper or freezer paper), and some happy helpers.Using the paint, make some shapes onto the paper.


We chose hearts in honor of V -day. Let them dry, then peel off the paper and stick them on your window for all to see! (puffy side on the window)
Sooo easy. I forgot to take a pic with them on the window, so you'll just have to try it yourself!
(I got the idea from my friend Megan)

Friday, January 22, 2010

Get Your Craft On!

That's right, ladies, get your craft on! It's about time we share our ideas/projects with each other, and what better place than our blog?! We are all creative and we have so much we can learn from one another. I know many of you have great ideas of crafts you do with your kids that I would LOVE to do with mine. Not only kid crafts, but why not ones we make for fun?! And not just crafts, but other hobbies as well. I mean, Shayne's an amazing decorator - I would love to get some tips from her! Kenna makes awesome stamps - how fun is that?! Not to mention all the great kids crafts she knows how to make, Kacie is always coming up with cute activities for her kids, Jaime makes fun crafts - I love that she made an ordinary shirt sassy with some fabric flowers (I would love to see where you got the idea!), Ronni is just amazing with all her talents, and Kelby has great ideas too. I mean seriously - with seven of us, we can come up with some great things! So - POST! Share your fun ideas, crafts, decorating tips, whatever you want. (Can you tell I'm pumped about this?!) If you got your idea from a great site - acknowledge it so we know where you got it! Let's GET OUR CRAFT ON! :)


So, since I'm so pumped about it - I'll go first. The most recent thing I have made was a little tutu for Josie. There are so many different ways you can make tutu's - this one just happens to be my favorite one. It's so simple to make.

All I did was measured how long I wanted it to be on Josie, then I took 2 yards of 2 different colors (usually I use 3) of tulle, cut them to the desired length (I make each layer a little shorter than the one underneath) and sewed them together. Then I took 2 1/2 inch ribbon, pinned it across and made a casing out if it. Once I sewed that on, I put elastic through it with the help of a safety pin, and then sewed it together. I then made a little bow to put in the back. It's so fun to embellish these tutu's with bows, gems, buttons, etc. You can do anything. I just decided to leave this one simple and plain. I got the great idea from my friend who had made one for Lydia a while ago.
So simple, cute, and fun! It sounds more difficult than it really is. I can't wait to see all of your ideas!